本文代码基于 Cilium HEAD 4093531,主要围绕 Cilium CNI 的 Operation 展开。
添加网络
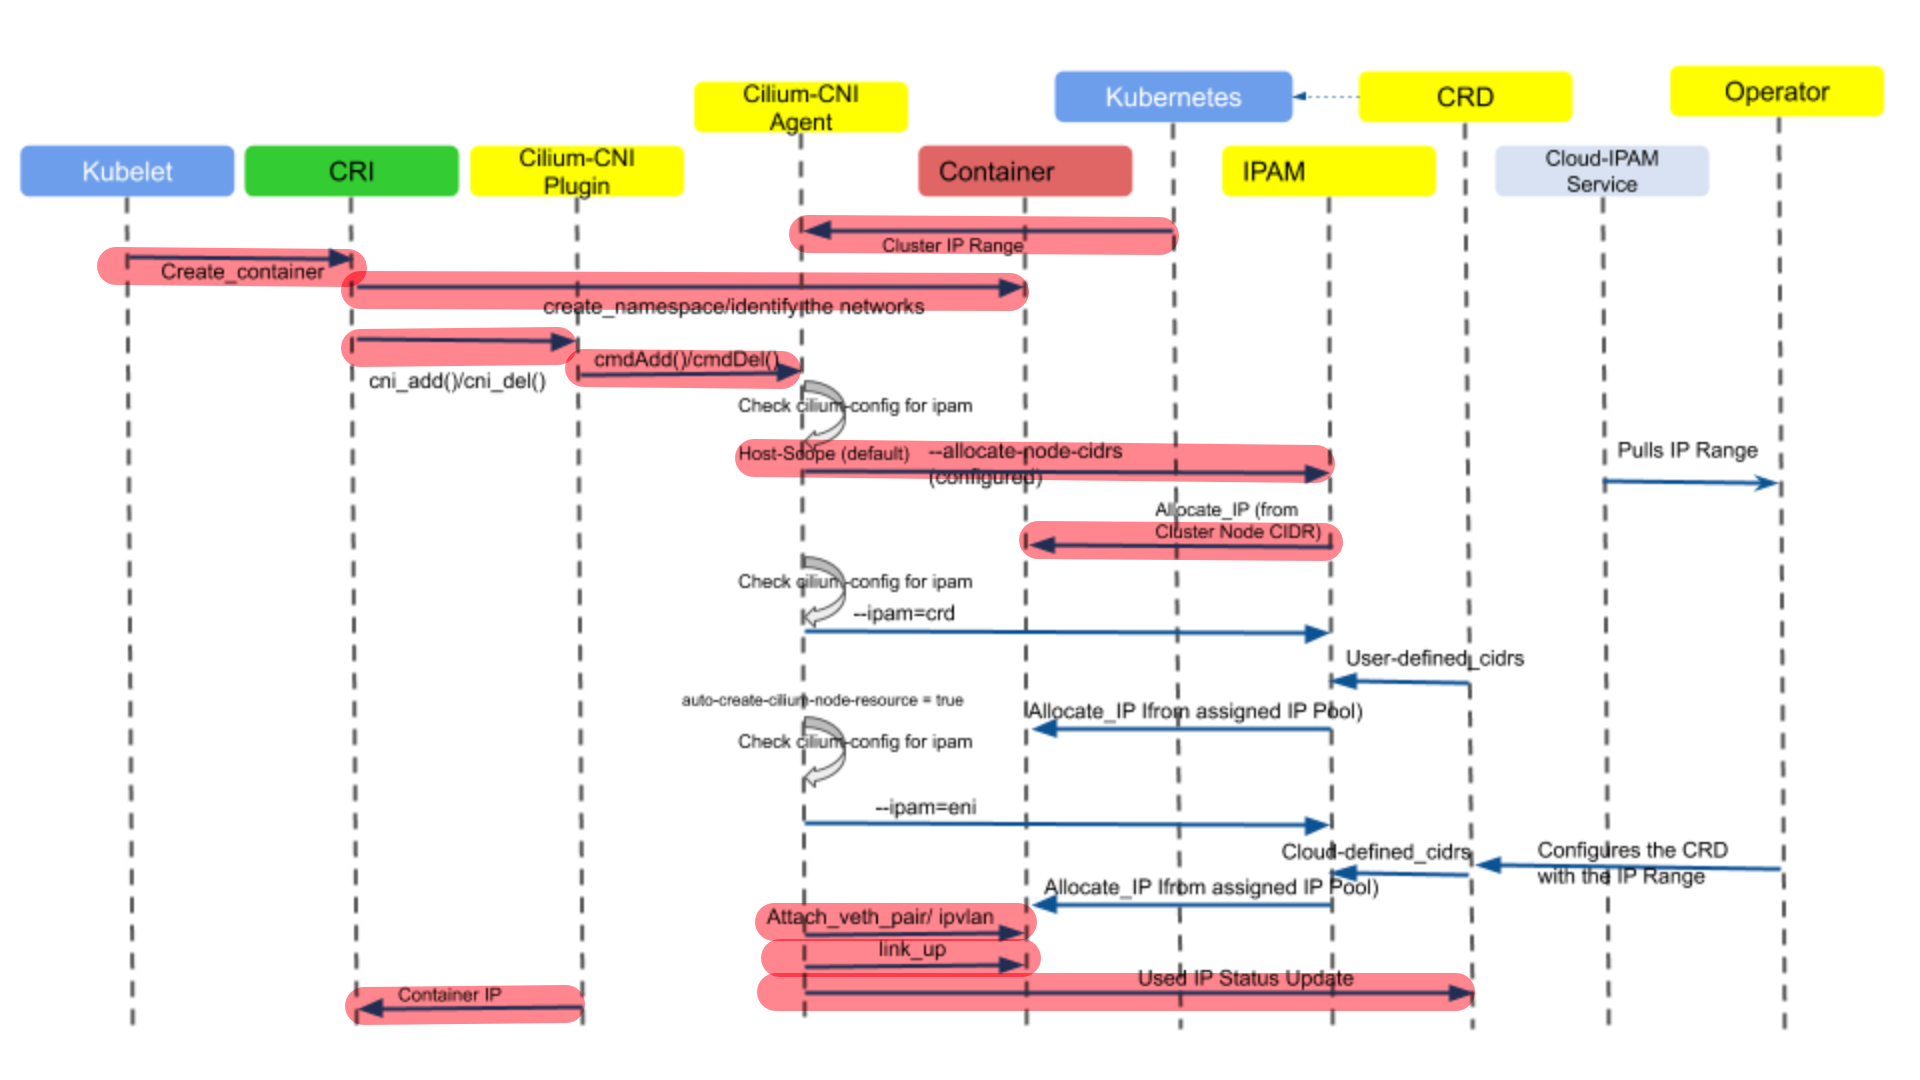
Cilium CNI 对于 ADD Operation 的操作定义在plugins/cilium-cni/main.go中,并由cmdAdd函数描述,该函数主要负责为 Pod 创建网络,其整体的控制时序流如下图所示。下图中在 IP 地址分配环节,描述了三种 IPAM 方式(host-scope、crd 和 eni),本文只关注 host-scope 这种默认的分配方式,即标记了红色背景的流程部分。
由于cmdAdd函数内容较多,下文将分段对其中重要的部分进行分析。
CNI 配置与参数加载
// part 1

func cmdAdd(args *skel.CmdArgs) (err error) {
	var (
		ipConfig *cniTypesV1.IPConfig
		routes   []*cniTypes.Route
		ipam     *models.IPAMResponse
		n        *types.NetConf
		c        *client.Client
		netNs    ns.NetNS
		conf     *models.DaemonConfigurationStatus
	)  // 一些函数内全局使用的变量

	n, err = types.LoadNetConf(args.StdinData)  // 读取 cni 网络配置:/etc/cni/net.d/05-cilium-cni.conf

	cniArgs := types.ArgsSpec{}
	cniTypes.LoadArgs(args.Args, &cniArgs)  // 加载 cni 参数

	c, err = client.NewDefaultClientWithTimeout(defaults.ClientConnectTimeout)  // 初始化一个客户端,以连接 cilium-daemon

	// ...
其中 Cilium CNI 网络配置文件05-cilium-cni.conf的默认内容如下所示:
{
    "cniVersion": "0.3.1",
    "name": "cilium",
    "type": "cilium-cni",
    "enable-debug": true,
    "log-file": "/var/run/cilium/cilium-cni.log"
}
另外,初始化的 Client,默认情况下其是通过 UDS (UNIX domain socket) 来与 cilium-daemon 进行通信的,
// pkg/client/client.go

func NewDefaultClient() (*Client, error) {
    return NewClient("")
}

func NewClient(host string) (*Client, error) {
	clientTrans, err := NewRuntime(host)
	return &Client{*clientapi.New(clientTrans, strfmt.Default)}, err
}

func NewRuntime(host string) (*runtime_client.Runtime, error) {
	if host == "" {
		host = DefaultSockPath()
	}
	tmp := strings.SplitN(host, "://", 2)  // 根据不同的协议,组织不同的地址,目前只支持 tcp 与 unix socket 两种协议
	switch tmp[0] {
	case "tcp":
		host = "http://" + tmp[1]
	case "unix":
		host = tmp[1]
	}

	transport := configureTransport(nil, tmp[0], host)
	httpClient := &http.Client{Transport: transport}
	clientTrans := runtime_client.NewWithClient(tmp[1], clientapi.DefaultBasePath, clientapi.DefaultSchemes, httpClient)
	return clientTrans, nil
}

func DefaultSockPath() string {
	e := os.Getenv(defaults.SockPathEnv)  // 从环境变量 CILIUM_SOCK 中获取 socket 地址
	if e == "" {
		e = defaults.SockPath  // 默认值为 /var/run/cilium/cilium.sock
	}
	return "unix://" + e
}
网口去重与 daemon 状态
Cilium CNI 对于传入的创建网络接口名会先进行检查,若已经存在,则执行“替换”操作(即删除已有的网络接口,后续再创建新的)。
// part 2

	netNs, err = ns.GetNS(args.Netns)  // 获取网络命名空间
	defer netNs.Close()

	err = netns.RemoveIfFromNetNSIfExists(netNs, args.IfName)  // 移除已存在的网络接口
                           \
                            \
                             func RemoveIfFromNetNSIfExists(netNS ns.NetNS, ifName string) error {
                                return netNS.Do(func(_ ns.NetNS) error {
                                    l, err := netlink.LinkByName(ifName)
                                    return netlink.LinkDel(l)
                                })
                             }

	addLabels := models.Labels{}

	conf, err = getConfigFromCiliumAgent(c)  // 从 cilium-agent 获取 cilium-daemon 的配置

	// ...
cilium-agent 是通过 Client 的 UDS 来向 cilium-daemon 发送请求以获取配置的,主要方法的调用栈如下:
|- getConfigFromCiliumAgent
   |- client.ConfigGet
      |- client.Daemon.GetConfig
最后,GetConfig方法实际上是通过向 cilium-daemon 的/config路径发送GET请求以获取配置的,
// api/v1/client/daemon/daemon_client.go

func (a *Client) GetConfig(params *GetConfigParams, opts ...ClientOption) (*GetConfigOK, error) {
	if params == nil {
		params = NewGetConfigParams()
	}
	op := &runtime.ClientOperation{
		ID:                 "GetConfig",
		Method:             "GET",
		PathPattern:        "/config",  // ***
		ProducesMediaTypes: []string{"application/json"},
		ConsumesMediaTypes: []string{"application/json"},
		Schemes:            []string{"http"},
		Params:             params,
		Reader:             &GetConfigReader{formats: a.formats},
		Context:            params.Context,
		Client:             params.HTTPClient,
	}
	for _, opt := range opts {  // opts 默认情况下为空
		opt(op)
	}

	result, err := a.transport.Submit(op)  // 提交请求
	success, ok := result.(*GetConfigOK)
	if ok {
		return success, nil
	}
	// 若执行到此处说明提交未成功,直接 panic
	panic(msg)
}
而在 cilium-daemon 这一侧,其在启动时就注册了路径相关的 API,其中就包括了/config的:
// daemon/cmd/daemon_main.go
// @ func (d *Daemon) instantiateAPI :: L1887-L1888

// /config/
restAPI.DaemonGetConfigHandler = NewGetConfigHandler(d)  // 对应 GET 请求
restAPI.DaemonPatchConfigHandler = NewPatchConfigHandler(d)
cilium-daemon 对于该接口的响应由两部分组成,而最终 Cilium CNI 关注的(即getConfigFromCiliumAgent函数返回的)就只有Status部分。
type DaemonConfiguration struct {
	// 描述了 daemon 的可变配置
	Spec *DaemonConfigurationSpec `json:"spec,omitempty"`

	// 目前 daemon 配置的相关状态,包括各种地址信息、可变与不可变配置项、node monitor 等
	Status *DaemonConfigurationStatus `json:"status,omitempty"`
}
IP 分配与 IPAM 模式
// part 3

	var releaseIPsFunc func(context.Context)
	if conf.IpamMode == ipamOption.IPAMDelegatedPlugin {  // 根据不同的 IPAM 模式来分配地址
		ipam, releaseIPsFunc, err = allocateIPsWithDelegatedPlugin(context.TODO(), conf, n, args.StdinData)
	} else {
		ipam, releaseIPsFunc, err = allocateIPsWithCiliumAgent(c, cniArgs)
	}

	// 若在地址分配时出现错误,则把分配的地址释放掉
	defer func() {
		if err != nil && releaseIPsFunc != nil {
			releaseIPsFunc(context.TODO())
		}
	}()

	// ipam.HostAddressing 记录了 Cilium 的 Internal IP
	connector.SufficientAddressing(ipam.HostAddressing)  // 检查该 IP 地址是否提供了足够的信息,即 ipv4 或 ipv6 地址至少需要一个

	// ...
Cilium CNI 会根据不同的 IPAM 模式来执行不同的 IP 地址分配策略,其中conf.IpamMode是由DaemonConfig.IPAM赋值的,该值默认情况下为:
~ kubectl get configmap cilium-config -n kube-system -o yaml | grep ipam

# ipam: kubernetes
Cilium 目前支持的完整的 IPAM 模式,由下列常量定义:
// pkg/ipam/option/option.go

const (
	IPAMKubernetes = "kubernetes"  // 默认值

	IPAMCRD = "crd"
	IPAMENI = "eni"
	IPAMAzure = "azure"
	IPAMClusterPool = "cluster-pool"
	IPAMClusterPoolV2 = "cluster-pool-v2beta"
	IPAMAlibabaCloud = "alibabacloud"

	IPAMDelegatedPlugin = "delegated-plugin"  // 走 CNI plugin 委托
)
Delegated Plugin
对于使用 CNI plugin 委托机制来分配 IP 地址的情况,其主要使用了所委托 CNI plugin 对应的 ADD 动作;对于释放 IP 地址的操作,其对应所委托 CNI plugin 的 DEL 动作。由于该函数只在IPAMDelegatedPlugin这一种模式下才生效,故最后还将 CNI plugin 委托调用的结果翻译为了IPAMResponse类型,以对齐allocateIPsWithCiliumAgent函数的返回值。
func allocateIPsWithDelegatedPlugin(ctx context.Context, conf *models.DaemonConfigurationStatus, netConf *types.NetConf, stdinData []byte,
) (*models.IPAMResponse, func(context.Context), error) {
	// netConf.IPAM.Type 描述了所委托 plugin 的名字,stdinData 描述了调用该委托所需的输入参数
	ipamRawResult, err := cniInvoke.DelegateAdd(ctx, netConf.IPAM.Type, stdinData, nil)  // 调用委托 plugin 的 CNI ADD
	if err != nil {
		// IP 地址分配失败,此时没有 IP 需要清理,故不返回 releaseFunc
		return nil, nil, fmt.Errorf("failed to invoke delegated plugin ADD for IPAM: %w", err)
	}

	// 预备好 CNI DEL 动作的闭包
	releaseFunc := func(ctx context.Context) {
		cniInvoke.DelegateDel(ctx, netConf.IPAM.Type, stdinData, nil)
	}

	ipamResult, err := cniTypesV1.NewResultFromResult(ipamRawResult)  // 上述委托调用返回的是原始结果,此处将其转换为 CNI spec v1.0 版本对应的结果
	if err != nil {
		return nil, releaseFunc, // msg
	}

	// 这里做格式统一,将委托调用的结果与通过 cilium-agent 分配 IP 的结果对齐
	ipam := &models.IPAMResponse{
		HostAddressing: conf.Addressing,
		Address:        &models.AddressPair{},
	}
	// 记录分配的每个 ipv4 或 ipv6 地址
	for _, ipConfig := range ipamResult.IPs {
		ipNet := ipConfig.Address
		if ipv4 := ipNet.IP.To4(); ipv4 != nil {
			ipam.Address.IPV4 = ipNet.String()
			ipam.IPV4 = &models.IPAMAddressResponse{IP: ipv4.String()}
		} else {
			ipam.Address.IPV6 = ipNet.String()
			ipam.IPV6 = &models.IPAMAddressResponse{IP: ipNet.IP.String()}
		}
	}

	return ipam, releaseFunc, nil
}
Cilium Agent
除了IPAMDelegatedPlugin模式之外,其他 IPAM 模式都会执行以下函数来分配 IP 地址。在该函数中,IP 地址的分配和释放都是通过 cilium-agent 来完成的。与上述 cilium-agent 获取 cilium-daemon 配置的方式一致,IPAMAllocate是通过 cilium-agent 向 cilium-daemon 的/ipam路径发送 POST 请求,而IPAMReleaseIP则是向 cilium-daemon 的/ipam/{ip}路径发送 DELETE 请求。
func allocateIPsWithCiliumAgent(client *client.Client, cniArgs types.ArgsSpec) (*models.IPAMResponse, func(context.Context), error) {
	podName := string(cniArgs.K8S_POD_NAMESPACE) + "/" + string(cniArgs.K8S_POD_NAME)  // namespaced name
	pool := ""
	ipam, err := client.IPAMAllocate("", podName, pool, true)  // 通过本地 cilium-agent 分配地址
	if err != nil {
		return nil, nil, err
	}
	if ipam.Address == nil {  // 无地址字段
		return nil, nil, err
	}

	releaseFunc := func(context.Context) {
		if ipam.Address != nil {
			releaseIP(client, ipam.Address.IPV4, pool)
			releaseIP(client, ipam.Address.IPV6, pool)
		}
	}

	return ipam, releaseFunc, nil
}

func releaseIP(client *client.Client, ip, pool string) {
	if ip != "" {
		err := client.IPAMReleaseIP(ip, pool)  // 通过本地 cilium-agent 释放地址
	}
}
在 cilium-daemon 中,注册有关 IPAM API 的 Handler 如下所示:
// daemon/cmd/daemon_main.go
// @ func (d *Daemon) instantiateAPI :: L1955-1960

if option.Config.DatapathMode != datapathOption.DatapathModeLBOnly {
    // /ipam/{ip}/
    restAPI.IpamPostIpamHandler = NewPostIPAMHandler(d)  // 对应 IPAMAllocate
    restAPI.IpamPostIpamIPHandler = NewPostIPAMIPHandler(d)
    restAPI.IpamDeleteIpamIPHandler = NewDeleteIPAMIPHandler(d)  // 对应 IPAMReleaseIP
}
对于分配新 IP 地址的 Handler 来说,其具体的调用链路如下所示:
|- daemon.ipam.AllocateNextWithExpiration @ daemon/cmd/ipam.go#L49
   |- ipam.AllocateNext                   @ pkg/ipam/allocator.go#222
      |- ipam.AllocateNextFamily
         |- ipam.allocateNextFamily
            |- allocator.AllocateNext     @ interface
               |- implemented by @ clusterPoolAllocator
                                 @ crdAllocator
                                 @ hostScopeAllocator
                                 @ noOpAllocator
其中AllocateNext方法是由Allocator接口(pkg/ipam/types.go)定义的,该方法用于分配下一个可用 IP 地址或当没有可用 IP 时返回错误。实现此方法的结构体有很多,但hostScopeAllocator是默认使用的(对应IPAMKubernetes模式)。在 host-scope IPAM 模式下,IP 地址是从 K8s 中每个 Node 定义的PodCIDR或PodCIDRs范围内分配的,如下图所示。

对于释放 IP 地址的 Handler 来说,其调用链路与上述分配过程类似,最后也都是调用Allocator接口的Release方法,该方法也有和上述一样的结构体实现。
Cilium Internal IP
无论使用哪种 IP 分配方式,最终分配 IP 的结果都保存在IPAMResponse结构体中。该结构体还存在一个名为HostAddressing的字段,该字段很容易被误解为 Pod 所在宿主机的 IP,但实际上它保存的是 Cilium Internal IP。与 K8s 中 Node 资源相对应,Cilium 也定义了一个名为 CiliumNode 的资源,用于表示 Cilium 所管理的 Node:
~ kubectl get ciliumnodes.cilium.io
NAME                 CILIUMINTERNALIP   INTERNALIP   AGE
kind-control-plane   10.244.0.48        172.19.0.4   2d11h
kind-worker          10.244.2.212       172.19.0.3   2d11h
kind-worker2         10.244.1.196       172.19.0.5   2d11h
从 CiliumNode 的 spec 可以看出,其集成了 Cilium CNI 所有需要关注的 IP 地址等信息,从而方便 cilium-agent 的获取。Cilium Internal IP 也是 Cilium 自动为每个 CiliumNode 分配的 IP,该 IP 与 Node 中定义的PodCIDRs同属一个网段。可以看出,Cilium Internal IP 的存在就是为了方便集群中 Nodes 间的通信,即由 CiliumNode 组成了一个 overlay 模式的网络。
在 IP 分配步骤的最后,还对 Cilium Internal IP 是否存在进行了检查。若该 IP 不存在,则退出 CNI Add Action 的执行。
veth 网口设置
默认情况下,在启动 cilium-daemon 的运行配置中,其 datapath 模式为veth,故一般都会进行 veth pair 的创建。截止到目前,Cilium 对于 datapath 模式的定义只包含两种:veth和lb-only(pkg/datapath/option/option.go)。
// part 4

	switch conf.DatapathMode {
	case datapathOption.DatapathModeVeth:  // veth 模式
		var (
			veth      *netlink.Veth
			peer      netlink.Link
			tmpIfName string
		)
		// 先在 host 侧创建 veth pair 接口
		veth, peer, tmpIfName, err = connector.SetupVeth(ep.ContainerID, int(conf.DeviceMTU), int(conf.GROMaxSize), int(conf.GSOMaxSize), ep)

		defer func() {
			if err != nil {
				err2 := netlink.LinkDel(veth)  // 配置失败时,删除该 veth pair 接口
			}
		}()

		err = netlink.LinkSetNsFd(peer, int(netNs.Fd()))  // 将 veth pair 的对端移动到 netns 中

		_, _, err = connector.SetupVethRemoteNs(netNs, tmpIfName, args.IfName)  // 最后在容器侧配置 veth 接口名
	}

	// ...
值得注意的是,本端 veth 接口与对端接口 link 在connector.SetupVeth中就已经创建完成了,其中本端接口与对端 link 存在以下命名规则:
- 对于本端接口名,为
lxc+sha256(containerID)的前 N 位 - 至于对端 link 名,为
tmp+sha256(containerID)的前 N 位;可以看出其所命名为临时名称
之后通过LinkSetNsFd将对端 link 加入到目标网络命名空间中,最后通过connector.SetupVethRemoteNs将对端 link 名更改为 CNI 参数中定义的网络接口名。当然,这其中涉及到的所有与网络接口有关的操作,都使用的是 netlink 库提供的接口。
Endpoint 路由生成
// part 5

	ep := &models.EndpointChangeRequest{  // 该结构体包含了 Cilium Endpoint 的所有可变元素
		ContainerID:           args.ContainerID,
		Addressing:            &models.AddressPair{},
		K8sPodName:            string(cniArgs.K8S_POD_NAME),
		K8sNamespace:          string(cniArgs.K8S_POD_NAMESPACE),
		// ...
	}

	state := CmdState{
		Endpoint: ep,
		Client:   c,
		HostAddr: ipam.HostAddressing,  // Cilium Interna IP
	}

	res := &cniTypesV1.Result{}  // 该函数最后的返回值

	if ipv4IsEnabled(ipam) {
		ep.Addressing.IPV4 = ipam.Address.IPV4
		ep.Addressing.IPV4ExpirationUUID = ipam.IPV4.ExpirationUUID

		ipConfig, routes, err = prepareIP(ep.Addressing.IPV4, &state, int(conf.RouteMTU))  // 解析 IP 格式,返回 IP 与网关地址;及对应路由

		res.IPs = append(res.IPs, ipConfig)
		res.Routes = append(res.Routes, routes...)
	}

	// if ipv6IsEnabled(ipam) { 略,其内容同上 }

	// ...
此段逻辑主要对应于cmdAdd函数对应返回值的构建,该返回值对应的IPs和Routes字段都是通过prepareIP函数对无论是来自于 Delegated Plugin 还是 cilium-agent 的 IP(默认为 CIDR 格式)地址进行解析才得到的:
func prepareIP(ipAddr string, state *CmdState, mtu int) (*cniTypesV1.IPConfig, []*cniTypes.Route, error) {
	var (
		routes []route.Route
		gw     string
		ip     netip.Addr
	)

	// 根据 CIDR 格式解析 IP 地址
	ipPrefix, err := netip.ParsePrefix(ipAddr)
	if err != nil {
		ip, err = netip.ParseAddr(ipAddr)  // 非 CIDR 格式的 IP 地址
	} else {
		ip = ipPrefix.Addr()
	}

	if ip.Is6() {
		// 逻辑同下,略
	} else {
		state.IP4 = ip
		state.IP4routes, err = connector.IPv4Routes(state.HostAddr, mtu)  // 获取需要被安装在 Endpoint 网络命名空间内的路由
		routes = state.IP4routes
		ip = state.IP4
		gw = connector.IPv4Gateway(state.HostAddr)  // 返回 Endpoint 对应的网关地址,即 Cilium Interna IP 地址 => return addr.IPV4.IP
	}

	rt := make([]*cniTypes.Route, 0, len(routes))
	for _, r := range routes {
		rt = append(rt, newCNIRoute(r))  // 转换为 CNI 支持的 Route 类型
	}
	gwIP := net.ParseIP(gw)

	return &cniTypesV1.IPConfig{
		Address: *iputil.AddrToIPNet(ip),
		Gateway: gwIP,
	}, rt, nil
}
其中,有关connector.IPv4Routes路由获取的部分,其入参state.HostAddr本质上就是 Cilium Internal IP。每个 Endpoint 在各自网络命名空间中都会使用此 Internal IP 来创建一条默认路由:对于所有未知目的 IP 的流量都会经过下一跳的 Cilium Internal IP 地址转发,此时该地址充当 Endpoint 的默认网关,而该网关地址则是一个前缀路由。
// pkg/datapath/connector/ipam.go

func IPv4Routes(addr *models.NodeAddressing, linkMTU int) ([]route.Route, error) {
	ip := net.ParseIP(addr.IPV4.IP)

	return []route.Route{
		{
			Prefix: net.IPNet{
				IP:   ip,
				Mask: defaults.ContainerIPv4Mask,  // 255.255.255.255
			},
		},
		{
			Prefix:  defaults.IPv4DefaultRoute,  // 0.0.0.0/32
			Nexthop: &ip,
			MTU:     linkMTU,
		},
	}, nil
}
Endpoint 创建
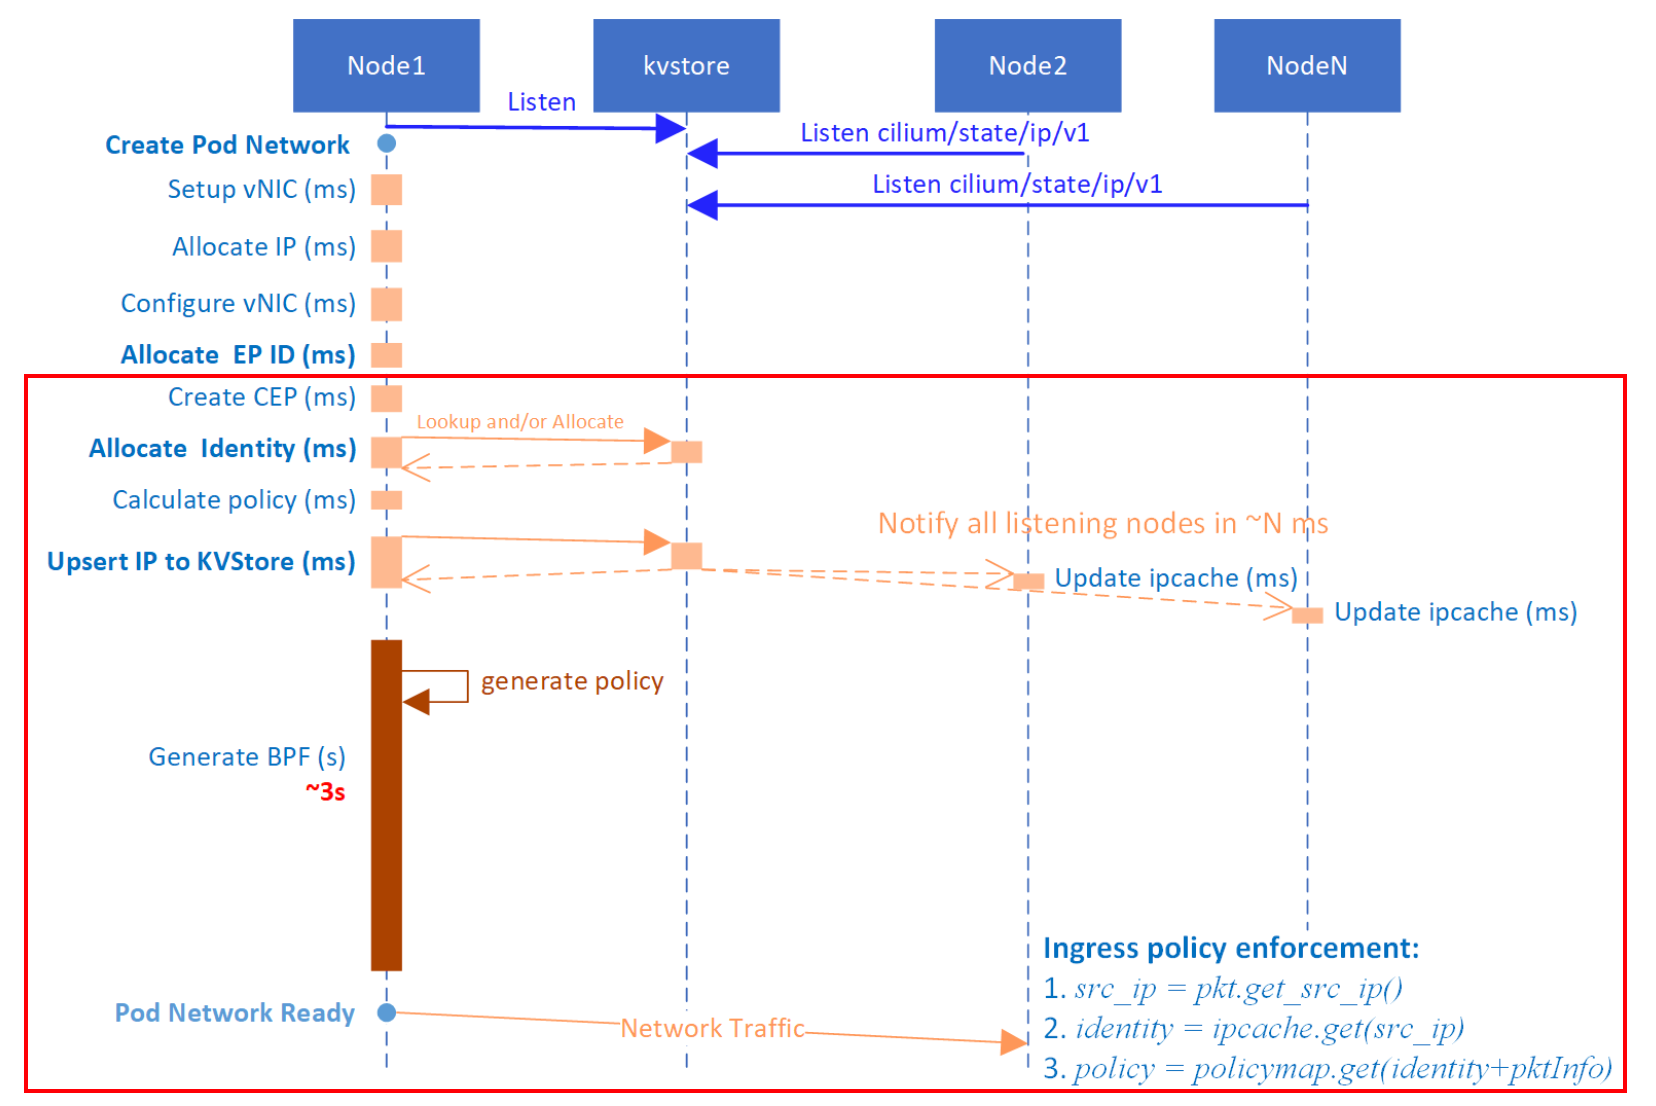
本节所述内容虽然没在文章开头的时序图中显示,但也是 CNI ADD 操作中最重要的一环。有关此步,arthurchiao 总结的一张图不错,可以参考:
// part 6

	var macAddrStr string
	err = netNs.Do(func(_ ns.NetNS) error {
		macAddrStr, err = configureIface(ipam, args.IfName, &state)  // 开启接口,并写入 ip 和路由,最后返回该接口的硬件 MAC 地址
		return err
	})

	res.Interfaces = append(res.Interfaces, &cniTypesV1.Interface{  // 记录网络接口
		Name:    args.IfName,
		Mac:     macAddrStr,
		Sandbox: args.Netns,
	})

	// 将接口的下标也添加至返回结果中
	for i := range res.Interfaces {
		res.IPs[i].Interface = cniTypesV1.Int(i)
	}

	// Endpoint 也必须要同步地进行重建
	ep.SyncBuildEndpoint = true
	err = c.EndpointCreate(ep)  // 创建 CiliumEndpoint

	return cniTypes.PrintResult(res, n.CNIVersion)
}
在所有网络接口准备就绪后,最后一步就是创建 CiliumEndpoint 资源了。创建该资源,也是由 cilium-agent 通过PutEndpointID向 cilium-daemon 的/endpoint/{id}路径发送 PUT 请求。发送请求时,携带的 Endpoint ID 为cilium-local:"",因为此时ep.ID还没有被赋值。
// pkg/client/endpoint.go

func (c *Client) EndpointCreate(ep *models.EndpointChangeRequest) error {
	id := pkgEndpointID.NewCiliumID(ep.ID)  // cilium-local:$id
	params := endpoint.NewPutEndpointIDParams().WithID(id).WithEndpoint(ep).WithTimeout(api.ClientTimeout)  // 构建请求参数
	_, err := c.Endpoint.PutEndpointID(params)
	return Hint(err)
}
cilium-daemon 对应/endpoint/{id}路径上的 Handler 如下所示:
// daemon/cmd/endpoint.go

func (h *putEndpointID) Handle(params PutEndpointIDParams) (resp middleware.Responder) {
	epTemplate := params.Endpoint

	ep, code, err := h.d.createEndpoint(params.HTTPRequest.Context(), h.d, epTemplate)  // ***

	return NewPutEndpointIDCreated()
}
createEndpoint的主要工作就是根据请求规定的内容来创建 Endpoint,其中还涉及了几点比较重要的工作:
AddEndpoint:为 Endpoint 分配 ID,并为每个 CiliumEndpoint CRD 启动一个 controllerUpdateLabels:根据 Pod 的 Labels 生成 Endpoint 的 Security identitiesRegenerate:重新生成 eBPF 程序和 Network Policy
// daemon/cmd/endpoint.go
func (d *Daemon) createEndpoint(ctx context.Context, owner regeneration.Owner, epTemplate *models.EndpointChangeRequest) (*endpoint.Endpoint, int, error) {
// 解析请求参数并创建 Endpoint
ep, err := endpoint.NewEndpointFromChangeModel(d.ctx, owner, d, d.ipcache, d.l7Proxy, d.identityAllocator, epTemplate)
// 检查 Endpoint ID 或 Container 对应的 Endpoint 是否已经存在
oldEp := d.endpointManager.LookupCiliumID(ep.ID)
oldEp = d.endpointManager.LookupContainerID(ep.GetContainerID())
// 检查 Endpoint IP 地址是否重复
var checkIDs []string
checkIDs = append(checkIDs, endpointid.NewID(endpointid.IPv4Prefix, ep.IPv4.String())) // $prefix:$ip
// ... aslo for ipv6
for _, id := range checkIDs {
oldEp, err := d.endpointManager.Lookup(id)
if err != nil || oldEp != nil {
return err
}
}
addLabels := labels.NewLabelsFromModel(epTemplate.Labels)
infoLabels := labels.NewLabelsFromModel([]string{})
err = d.endpointManager.AddEndpoint(owner, ep, "Create endpoint from API PUT") // ***
regenTriggered := ep.UpdateLabels(ctx, addLabels, infoLabels, true) // ***
if !regenTriggered {
regenMetadata := ®eneration.ExternalRegenerationMetadata{
RegenerationLevel: regeneration.RegenerateWithDatapathRewrite,
// ...
}
build, err := ep.SetRegenerateStateIfAlive(regenMetadata)
if build {
ep.Regenerate(regenMetadata) // ***
}
}
return ep, 0, nil
}
AddEndpoint
此函数的调用路径如下。在为 Endpoint 分配完 ID 之后,Cilium 会为每个 CiliumEndpoint(CEP)的 CRD 都开启一个 controller 用于从当前 Endpoint 同步数据。
|- AddEndpoint                                         @ pkg/endpointmanager/manager.go#L605
   |- endpointManager.expose
      |- AllocateID
      |- EndpointSynchronizer.RunK8sCiliumEndpointSync @ pkg/k8s/watchers/endpointsynchronizer.go#L49
CiliumEndpoint 的 controller 实现如下(有部分删减),每个 controller 的调谐执行都存在 10s 的运行间隔:
// pkg/k8s/watchers/endpointsynchronizer.go

func (epSync *EndpointSynchronizer) RunK8sCiliumEndpointSync(e *endpoint.Endpoint, conf endpoint.EndpointStatusConfiguration) {
	var (
		endpointID     = e.ID
		controllerName = endpoint.EndpointSyncControllerName(endpointID)
	)
	ciliumClient := epSync.Clientset.CiliumV2()

	var (
		localCEP *cilium_v2.CiliumEndpoint // 本地 CEP 对象的副本,可以复用
		needInit = true                    // needInit 表面可能需要去创建 CEP
		firstTry = true                    // 尝试从 k8s cache 中获取 CEP 对象
	)

	e.UpdateController(controllerName,
		controller.ControllerParams{
			RunInterval: 10 * time.Second,
			DoFunc: func(ctx context.Context) (err error) {
				podName := e.GetK8sPodName()
				namespace := e.GetK8sNamespace()

				if needInit {
					if firstTry {
						// 首先尝试从 API server cache 中获取 CEP 对象
						localCEP, err = ciliumClient.CiliumEndpoints(namespace).Get(ctx, podName, meta_v1.GetOptions{ResourceVersion: "0"})
						firstTry = false
					} else {
						localCEP, err = ciliumClient.CiliumEndpoints(namespace).Get(ctx, podName, meta_v1.GetOptions{})
					}

					switch {
					case k8serrors.IsNotFound(err):  // 对于 CEP 对象不存在的情况,那就创建新的 CEP 对象
						pod := e.GetPod()
						cep := &cilium_v2.CiliumEndpoint{  // 初始化新的 CEP 对象
							ObjectMeta: meta_v1.ObjectMeta{
								Name: podName,  // CEP 对象与 Pod 同名
								OwnerReferences: []meta_v1.OwnerReference{  // 其 owner 就是 Endpoint 对应的 Pod
									{
										APIVersion: "v1",
										Kind:       "Pod",
										Name:       pod.GetObjectMeta().GetName(),
										UID:        pod.ObjectMeta.UID,
									},
								},
								Labels: pod.GetObjectMeta().GetLabels(),
							},
							Status: *mdl,
						}
						localCEP, err = ciliumClient.CiliumEndpoints(namespace).Create(ctx, cep, meta_v1.CreateOptions{})  // 创建 CEP 对象
					default:
						return err
					}

					needInit = false
				}

				// 对于 localCEP 为 nil 的情况,先从 API server 中尝试获取最新的 CEP 对象
				if localCEP == nil {
					localCEP, err = ciliumClient.CiliumEndpoints(namespace).Get(ctx, podName, meta_v1.GetOptions{})
					switch {
					// 若没有找到,则说明 CEP 还未创建,此时先做标记,等下一次调谐时进行创建
					case k8serrors.IsNotFound(err) || k8serrors.IsInvalid(err):
						needInit = true
						return err
					}
				}
			},
			StopFunc: func(ctx context.Context) error {
				return deleteCEP(ctx, scopedLog, ciliumClient, e)  // 直接通过 ciliumClient.CiliumEndpoints(namespace).Delete 接口删除
			},
		})
}
UpdateLabels
在 cilium-daemon 中,一个 Pod 的 Labels 会被分成两种类型:identityLabels�和informationLabels,即分别对应addLabels和infoLabels两个变量保存。其中,只有前者才会保存identityLabels。有关这些 Labels 是如何划分的,可以参考 labelPrefixCfg.filterLabels 方法。
// pkg/endpoint/endpoint.go

func (e *Endpoint) UpdateLabels(ctx context.Context, identityLabels, infoLabels labels.Labels, blocking bool) (regenTriggered bool) {
	// 替换 endpoint 中的 infomation labels
	e.replaceInformationLabels(infoLabels)
	// 替换 identity labels,若 labels 发生变化则更新 identity;若网络发生变化则返回 identityRevision,否则返回 0
	rev := e.replaceIdentityLabels(identityLabels)
	e.unlock()
	if rev != 0 {
		return e.runIdentityResolver(ctx, rev, blocking)  // 若 identity 发生变化,则重新进行解析
	}

	return false
}
Security identities 的变化取决于identityLabels的变化。方法runIdentityResolver的调用栈如下所示:
|- Endpoint.runIdentityResolver                    @ pkg/endpoint/endpoint.go
   |- Endpoint.identityLabelsChanged
      |- CachingIdentityAllocator.AllocateIdentity @ pkg/identity/cache/allocator.go
         |- Allocator.Allocate                     @ pkg/allocator/allocator.go
      |- Endpoint.SetIdentity                      @ pkg/endpoint/policy.go
         |- Endpoint.runIPIdentitySync
            |- UpsertIPToKVStore                   @ pkg/ipcache/kvstore.go
      |- Endpoint.forcePolicyComputation
由于 Security identities 是一个集群级别的概念,即集群内每个 Security identity 都唯一,所以 identity 需要一个集群内的全局组件来进行分配。在Allocate方法中可以发现,此职责由 kvstore(即 etcd)担任。Allocate首先根据提供的 key 到 kvstore 中查找,若没有找到任何对应的 ID 被分配,则针对此 key 创建新的 ID。若分配失败,还会进行maxAllocAttempts次的重试。
// pkg/allocator/allocator.go

func (a *Allocator) Allocate(ctx context.Context, key AllocatorKey) (idpool.ID, bool, bool, error) {

	for attempt := 0; attempt < maxAllocAttempts; attempt++ {  // maxAllocAttempts 固定为 16 次
		if val := a.localKeys.use(k); val != idpool.NoID {  // identity 为 0 说明 ID 不存在
			a.mainCache.insert(key, val)
			return val, false, false, nil  // 第二个返回值表示在 kvstore 中是否有新 ID 被创建
		}

		value, isNew, firstUse, err = a.lockedAllocate(ctx, key)  // 分配新的 ID
		if err == nil {
			a.mainCache.insert(key, value)
			return value, isNew, firstUse, nil
		}
	}

	return 0, false, false, err
}
当 Endpoint 的 identity 计算完成后,cilium-daemon 会继续通过UpsertIPToKVStore来更新或插入 IP->Identity 的映射关系到 kvstore:
// pkg/ipcache/kvstore.go

func UpsertIPToKVStore(ctx context.Context, IP, hostIP net.IP, ID identity.NumericIdentity, key uint8, metadata, k8sNamespace, k8sPodName string, npm types.NamedPortMap) error {
	// 按命名端口名称的字典序为端口排序
	namedPorts := // ...

	ipKey := path.Join(IPIdentitiesPath,  // => "cilium/state/ip/v1"
                       AddressSpace, IP.String())
	ipIDPair := identity.IPIdentityPair{
		IP:           IP,
		ID:           ID,
		// ...
		NamedPorts:   namedPorts,
	}

	marshaledIPIDPair, err := json.Marshal(ipIDPair)

	err = globalMap.store.upsert(ctx, ipKey, string(marshaledIPIDPair), true)  // update/insert
	return err
}
Regenerate
当identityLabels发生变化时,重新生成的不止有 Security identity,还有该 Endpoint 对应的 eBPF 程序和 Network Policy。在ep.Regenerate方法中,cilium-daemon 将 regen 抽象为了一个事件并加入到了事件队列中:
// pkg/endpoint/policy.go

func (e *Endpoint) Regenerate(regenMetadata *regeneration.ExternalRegenerationMetadata) <-chan bool {
	done := make(chan bool, 1)

	regenContext := ParseExternalRegenerationMetadata(ctx, cFunc, regenMetadata)
	epEvent := eventqueue.NewEvent(&EndpointRegenerationEvent{  // 创建重新生成(regen)事件
		regenContext: regenContext,
		ep:           e,
	})

	resChan, err := e.eventQueue.Enqueue(epEvent)  // 将 regen 事件加入到事件队列中

	go func() {
		select {
		case result, ok := <-resChan:
			if ok {
				regenResult := result.(*EndpointRegenerationResult)  // 根据 regen 事件的执行结果判断是否构建成功
				buildSuccess = regenResult.err == nil
			}
		}
		done <- buildSuccess
		close(done)
	}()

	return done
}
Cilium 在运行事件队列的地方消费事件,各种不同的事件类型都实现了EventHandler接口定义的方法:
// pkg/eventqueue/eventqueue.go

func (q *EventQueue) Run() {  // 事件消费
	go q.run()
}

func (q *EventQueue) run() {
	q.eventQueueOnce.Do(func() {
		defer close(q.eventsClosed)
		for ev := range q.events {
			select {
			default:
				ev.Metadata.Handle(ev.eventResults)  // 事件处理
				close(ev.eventResults)
			}
		}
	})
}

type EventHandler interface {
	Handle(chan interface{})
}
eBPF 程序的生成其实就是一系列文件操作。在EndpointRegenerationEvent定义的Handle中,其最后就是调用Endpoint.regenerate方法,该方法首先获取两个目录:State和Next。其中,后者属于临时目录,在每次生成过程中先创建然后再删除;而前者则由 cilium-daemon 配置指定,其默认位于/var/run/cilium目录下。
// pkg/endpoint/policy.go

func (e *Endpoint) regenerate(ctx *regenerationContext) (retErr error) {

	origDir := e.StateDirectoryPath()
	ctx.datapathRegenerationContext.currentDir = origDir  // $(daemonConfig.StateDir)/$(ep.StringID)

	// temporary 目录用于保存生成的头文件
	tmpDir := e.NextDirectoryPath()
	ctx.datapathRegenerationContext.nextDir = tmpDir  // ./$(ep.StringID)_next

	// 移除现有的 temporary 目录
	if err := e.removeDirectory(tmpDir); err != nil && !os.IsNotExist(err) {
		return // err
	}

	// 创建 temporary 目录
	err := os.MkdirAll(tmpDir, 0777)

	defer func() {
		e.removeDirectory(tmpDir)
	}()

	revision, stateDirComplete, err = e.regenerateBPF(ctx)  // ***

	// 将所有 verifier 的日志写入到 temporary 目录下
	var ve *ebpf.VerifierError
	if errors.As(err, &ve) {
		p := path.Join(tmpDir, "verifier.log")
		f, err := os.Create(p)
        err := fmt.Fprintf(f, "%+v\n", ve)
	}

	return e.updateRealizedState(stats, origDir, revision, stateDirComplete)
}
regenerateBPF方法的核心调用栈如下所示,其主要分为两步:
runPreCompilationSteps用于在 BPF 程序编译之前运行所有有关此次重建的必要步骤,其中重点就是头文件的编写realizeBPFState用于为 Endpoint 编译并安装 eBPF 程序,根据重建程度的不同以调用 Loader 不同的方法
|- Endpoint.regenerateBPF                      @ pkg/endpoint/bpf.go
   |- Endpoint.runPreCompilationSteps
      |- writeHeaderfile
          |- writeInformationalComments
          |- WriteEndpointConfig               @ pkg/datapath/linux/config/config.go
             |- writeIncludes
             |- writeStaticData
             |- writeTemplateConfig
   |- Endpoint.realizeBPFState
      |- Loader.CompileAndLoad   # if          @ pkg/datapath/loader/loader.go
       - Loader.CompileOrLoad    # elif
       - Loader.ReloadDatapath   # else
CompileAndLoad
下文以Loader.CompileAndLoad方法为例,分析其主要工作:
// pkg/datapath/loader/loader.go

func (l *Loader) CompileAndLoad(ctx context.Context, ep datapath.Endpoint, stats *metrics.SpanStat) error {
	dirs := directoryInfo{
		Library: option.Config.BpfDir,     // /var/lib/cilium/bpf,存放 BPF 模版文件
		Runtime: option.Config.StateDir,
		State:   ep.StateDir(),
		Output:  ep.StateDir(),
	}
	return l.compileAndLoad(ctx, ep, &dirs, stats)
}

func (l *Loader) compileAndLoad(ctx context.Context, ep datapath.Endpoint, dirs *directoryInfo, stats *metrics.SpanStat) error {
	err := compileDatapath(ctx, dirs, ep.IsHost(), ep.Logger(Subsystem))  // 工作1
	err = l.reloadDatapath(ctx, ep, dirs)  // 工作2
	return err
}
它首先通过compileDatapath函数来为 BPF 的 datapath 调用编译器和链接器创建所有的 state 文件,这些文件的最终编译目标都为 ELF 二进制格式。编译过程也分为两次程序调用:clang 先生成 LLVM 比特码,llc 再将其编译为字节码。
编译程序的源文件为bpf_lxc.c(可见{cilium}/bpf/bpf_lxc.c),编译的结果存储在/var/run/cilium/state/${ID}之下。
func compileDatapath(ctx context.Context, dirs *directoryInfo, isHost bool, logger *logrus.Entry) error {

	versionCmd := exec.CommandContext(ctx, compiler, "--version")
	compilerVersion, err := versionCmd.CombinedOutput(scopedLog, true)  // 检查编译器的状态

	versionCmd = exec.CommandContext(ctx, linker, "--version")
	linkerVersion, err := versionCmd.CombinedOutput(scopedLog, true)  // 检查链接器的状态

	// 编译新的程序
	prog := epProg  // => struct epProg = {Source: "bpf_lxc.c", Output: "bpf_lxc.o", OutputType: "obj"}
	compile(ctx, prog, dirs)

	return nil
}

func compile(ctx context.Context, prog *progInfo, dir *directoryInfo) (err error) {
	args := make([]string, 0, 16)
	if prog.OutputType == outputSource {
		args = append(args, "-E") // Preprocessor
	} else {
		args = append(args, "-emit-llvm")
		args = append(args, "-g")
	}

	// 追加各种编译参数
	args = append(args, standardCFlags...)
	args = append(args, prog.Options...)
	args = append(args, progCFlags(prog, dir)...)

	switch prog.OutputType {
	case outputSource:
		compileCmd := exec.CommandContext(ctx, compiler, args...)
		_, err = compileCmd.CombinedOutput(log, true)
	case outputObject, outputAssembly:
		err = compileAndLink(ctx, prog, dir, args...)  // 编译执行与链接
	}

	return err
}
其次再通过reloadDatapath方法来重载 BPF 程序,该方法的核心调用栈如下所示,其主要是将 BPF 程序加载到与 Endpoint 关联的网络接口上。该 BPF 程序的加载是通过 linux 内核工具tc(traffic control)来实现的。
|- Loader.reloadDatapath   @ pkg/datapath/loader/loader.go
   |- replaceDatapath      @ pkg/datapath/loader/netlink.go
      |- attachProgram
         |- replaceQdisc
删除网络
相比于 CNI ADD 动作,CNI DEL 动作就相对简单了不少:它负责将在 CNI ADD 中创建的 Endpoint、IP 和网络接口统统移除。由于其所涉及的工作方式与 CNI ADD 动作类似,故本节不再展开详细的描述。
func cmdDel(args *skel.CmdArgs) error {
	n, err := types.LoadNetConf(args.StdinData)

	cniArgs := types.ArgsSpec{}
	cniTypes.LoadArgs(args.Args, &cniArgs)  // 提取 CNI 参数

	c, err := lib.NewDeletionFallbackClient(logger)  // 初始化 client

	id := endpointid.NewID(endpointid.ContainerIdPrefix, args.ContainerID)  // Prefix: "container-id"
	c.EndpointDelete(id)  // 删除 Endpoint

	if n.IPAM.Type != "" {
		err = cniInvoke.DelegateDel(context.TODO(), n.IPAM.Type, args.StdinData, nil)  // 释放 IP
	}

	netNs, err := ns.GetNS(args.Netns)
	defer netNs.Close()
	err = netns.RemoveIfFromNetNSIfExists(netNs, args.IfName)  // 移除网络命名空间中的接口

	return nil
}
总结
本文围绕 cilium-cni 的主要能力展开了简单的分析,cilium-cni 本身并没有难以理解的地方。相反,cilium-daemon 作为 CNI 能力的来源,其设计就复杂了许多。本文对于 cilium-daemon 的探究很多时候都是点到为止,尤其是在“Endpoint 创建”相关的章节。因为篇幅原因以及作者水平实在有限,许多问题都没能深入展开,比如:
- cilium-cni 加载的这个 BPF 程序提供了哪些网络能力?即
bpf_lxc.c涉及到的网络工作原理 BPF 程序加载到网络接口是如何配合 tc 来完成的?具体涉及哪些操作?详见 tc ReloadDatapath 博客的分析- Endpoint 的 Security identity 发生变化时,其 Network Policy 又是如何变化的?其又是如何计算的?
Reference
- https://docs.cilium.io/en/stable/network/concepts/ipam/kubernetes/
- https://docs.cilium.io/en/stable/network/concepts/ipam/deep_dive/
- https://docs.cilium.io/en/stable/internals/security-identities/
- http://arthurchiao.art/blog/cilium-code-cni-create-network/
- https://www.cni.dev/docs/spec/#section-4-plugin-delegation